Having posts with useful information that your followers can see, share, and discuss is one of the best ways to boost engagement for your Facebook page. One of the easiest ways to do this is having a post that update relevant information on a regular basis. But doing that requires time commitment on your part… unless you automate it.
This post will guide you through the process of creating your own Facebook “bot” that will post a status update to your Facebook page on a regular basis using Python and GitHub Actions.
Before we begin, make sure you have a Page Access Token and have a GitHub account.
What we’ll do
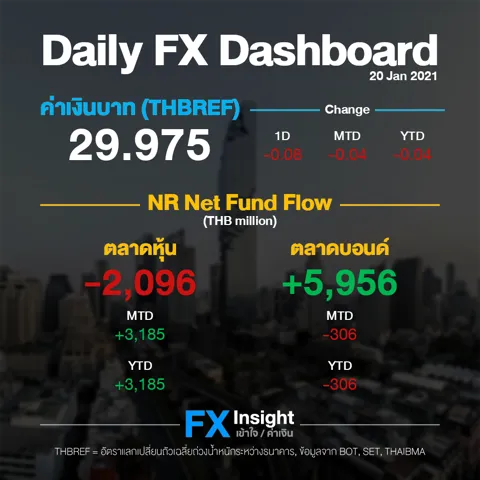
We’ll write a script that would create something like this and post it to our Facebook page. (For non-Thais, the post should give an update on the USDTHB exchange rate, non-resident funds flow for stocks and bonds, as well as various changes.)
More specifically, the sript will pull various financial market information, create a photo out of it, and post it to the page at the end of each trading day. Let’s get started!
Making the image
Creating a template
The first thing we need to do is create a template. Go with any software of your choice (for me it was Illustrator) and lay out where you’d like your variable texts to be.
TipIt’s helpful to think about text justification and fonts right away so you have a good reference when you place your (variable) text.
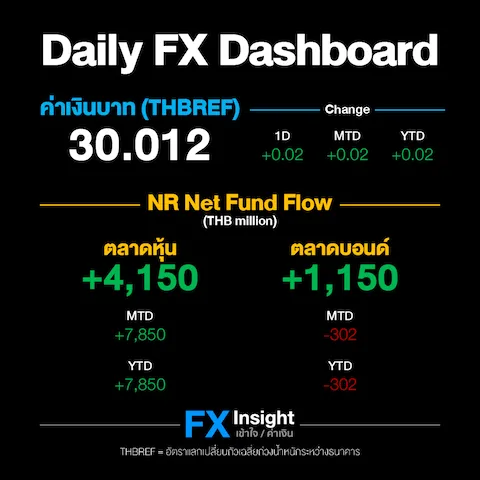
I end up with something like this:
Background
The template looks a little bland, doesn’t it? We’ll put a background photo in. You could, of course, go to Photoshop, edit some photos, save them, and call it a day. But we’ll go beyond that. We’ll try to change the background photo every month, so some image processing is required.
For now, the steps will include blurring the image, and decreasing the brightness so that only a glimpse of the image could be seen.
from PIL import Image, ImageEnhance, ImageFilter

# open our image
bkg_img = Image.open("resources/bkg.png")

# blur and dim
b = bkg_img.convert('L').resize((1, 1)).getpixel((0, 0)) # get average brightness
bkg_img = bkg_img.filter(ImageFilter.GaussianBlur(3))
enhancer = ImageEnhance.Brightness(bkg_img)
bkg = enhancer.enhance(40/b)

# add in template
template = Image.open("resources/template.png")
bkg.paste(template, (0, 0), template)
Note that we can’t just dim the image by some constant amount. Since this will need to work for any image regardless of its original brightness, we need to first find the average brightness of the image (line 5) and dim it accordingly (lines 7 and 8).
Note also that the template we put in on line 11 is the one without placeholder text.
At this point, our bkg should look something like this:
Add text
The next step is to add the info. We’ll assume that we already have acquired (through various means… ahem!) the necessary data from various sources (please refer to my [Thai] post on scraping here).
First let’s define the fonts that we’ll be using. Note that font sizes can be taken readily from Illustrator.
from PIL import ImageFont

font_thb = ImageFont.truetype(font='resources/DB Helvethaica X Bd v3.2.ttf', size=130, index=0, encoding='')
font_flow = ImageFont.truetype(font='resources/DB Helvethaica X Bd v3.2.ttf', size=106, index=0, encoding='')
font_date = ImageFont.truetype(font='resources/DB Helvethaica X Bd v3.2.ttf', size=36, index=0, encoding='')
font_change = ImageFont.truetype(font='resources/DB Helvethaica X v3.2.ttf', size=48, index=0, encoding='')
For areas where we define change, we want positive changes to be in green, and negative changes in red. Some helper functions would be, well, helpful:
def get_color(v):
    if v >= 0:
        return "#01b651" #green
    return "#cc1111" #red

def draw_change_text(draw_obj, pos, v, font=font_change, formatter='{:+.2f}'):
    draw_obj.text(pos, formatter.format(v), font=font, anchor="ms", fill=get_color(v))
The draw_change_text function takes in the draw object, position of the text,
value, font, and numerical format.
Note that the anchor option
is set to "ms" which means we want the position we specify
to be vertically in the middle of the textbox, and horizontally on the text’s baseline.
What’s left for us to do now is to add the info we need!
tmp = bkg.copy()
draw = ImageDraw.Draw(tmp)

# place texts

draw.text((877, 160), curdate.strftime('%d %b %Y'), font=font_date, anchor="rs", fill="white")
draw.text((280, 320), '{:.3f}'.format(var_thb), font=font_thb, anchor="ms", fill="white")

draw_change_text(draw, (565, 320), var_thb_1d)
draw_change_text(draw, (695, 320), var_thb_mtd)
draw_change_text(draw, (825, 320), var_thb_ytd)

draw_change_text(draw, (280, 590), var_stock, font=font_flow, formatter='{:+,.0f}')
draw_change_text(draw, (280, 680), var_stock_mtd, formatter='{:+,.0f}')
draw_change_text(draw, (280, 780), var_stock_ytd, formatter='{:+,.0f}')

draw_change_text(draw, (680, 590), var_bond, font=font_flow, formatter='{:+,.0f}')
draw_change_text(draw, (680, 680), var_bond_mtd, formatter='{:+,.0f}')
draw_change_text(draw, (680, 780), var_bond_ytd, formatter='{:+,.0f}')
Now tmp should contain the final image that is ready to be uploaded.
The next step is to convert it to byte array and upload it to Facebook.
Uploading to Facebook
First we’ll convert the image to byte array using io.BytesIO():
img_byte_arr = io.BytesIO()
tmp.save(img_byte_arr, format='png')
img_byte_arr = img_byte_arr.getvalue()
We also would like to caption the image just in case the image doesn’t load or people prefer reading.
msg = (("{}\n\n"
        "เรทเฉลี่ยค่าเงินบาท (THBREF) {:0.3f} บาท ต่อ 1 ดอลลาร์ สรอ.\n\n"
        "ต่างชาติ{}หุ้นสุทธิ {:,.0f} ล้านบาท {}บอนด์สุทธิ {:,.0f} ล้านบาท")
       .format(curdate.strftime('%d/%m/%Y'),
               var_thb,
               'ขาย' if var_stock < 0 else 'ซื้อ', abs(var_stock),
               'ขาย' if var_bond < 0 else 'ซื้อ', abs(var_bond)))
Uploading to Facebook is fairly simple, given that you have a valid
Facebook Page Access Token.
Since your access token should be kept secret,
you should never put in directly into your code.
A general practice is to save in in an environment variable
(here I call it FACEBOOK_ACCESS_TOKEN)
and use os.getenv(...) to retrieve it.
import facebook
import os

album_id = os.getenv('ALBUM_ID')
if not album_id:
  album_id = 'me'
graph = facebook.GraphAPI(access_token=os.getenv('FACEBOOK_ACCESS_TOKEN'), version='3.1')
api_request = graph.put_photo(image=img_byte_arr,
                message=msg, album_path=album_id + "/photos")
I also want to upload all the images to a specific album, so I created a new album and get its album ID from the URL. And that’s it. Once you get this code running, you should see your image appear in your album (or your timeline).
Automate it!
Now comes the best part. Instead of having to manually run this script every day, you can get GitHub Actions to do it for you!
First let’s create requirements.txt which would tell GitHub Actions
which packages we need to run this script.
For me, my requirement file looks like this:
requests==2.24.0
facebook-sdk==3.1.0
Pillow==8.0.1
Right now your project folder should look something like this:
/project
- main.py
- requirements.txt
- /resources
  - bkg.png
  - [fonts]
Push into GitHub repo
To take advantage of GitHub Actions, you’ll need to first
push this project folder to your GitHub repository.
If you’re new to git and not sure how to do that,
there’s plenty of information online.
You might start with GitHub Docs.
Create secrets
Remember the FACEBOOK_ACCESS_TOKEN?
It’s only in the environment variable in your local computer.
Luckily, you can put a secret into GitHub repo.
Go to your repo page, Settings, and on the left menu select Secrets.
Add your access token as a secret.
You can name it whatever, but why don’t we stay consistent and call it FACEBOOK_ACCESS_TOKEN too?
Do the same thing for other secrets you need, like API keys, album ID, etc.
Create a new workflow
Now that secrets are in place, we’re ready to create a new workflow! Go to Actions > New workflow > set up a workflow yourself. Paste this code in. Don’t worry, we’ll go through it line-by-line.
name: Daily FX Dashboard

# Controls when the action will run.
on:
  # Allows you to run this workflow manually from the Actions tab
  workflow_dispatch:
  schedule:
    - cron: '5 11 * * *' # runs at 18:05 (GMT+7)

# A workflow run is made up of one or more jobs that can run sequentially or in parallel
jobs:
  update-fx:
    runs-on: ubuntu-latest
    steps:
      - uses: actions/checkout@v2
      - uses: actions/setup-python@v2
        with:
          python-version: '3.x'
      - name: Install dependencies
        run: |
          python -m pip install --upgrade pip
          pip install -r requirements.txt
      - name: Execute script
        env:
          BOT_API_KEY: ${{ secrets.BOT_API_KEY }}
          FACEBOOK_ACCESS_TOKEN: ${{ secrets.FACEBOOK_ACCESS_TOKEN }}
          ALBUM_ID: ${{ secrets.ALBUM_ID }}
        run: python main.py
The first line is just the name of the workflow.
Lines 4 through 8 specifies on which conditions the workflow should run.
Here, we say that there are two ways to run the workflow:
manually (by specifying workflow_dispatch)
and on schedule using cron.
A workflow can consist of many jobs, but here we just have one, called update-fx.
The job would run on latest version of Ubuntu, and take the steps specified:
- Checkout the repo
- Setup python
- Upgrade
pipand install packages specified inrequirements.txt - Set environment variables from repo secrets
- Run
main.py
Conclusion
Anddddd, that’s it! We have set up a script to pull info from different sources, generate an image from it, post it to Facebook, and automate all of this… all using free services! I hope you find this useful 🙂
Lastly, if you would like to check out the source code, you can find it in this repo. Also, the album of the Daily FX Dashboard, updated at the end of each trading day, can be found here.


